Teacher Showcase: Student Video Production with Tracy Donnelly and Kristen Ireland

Our new digital playground makes student video easier than ever before. Check out how two Northview teachers are doing it!

This post is rich with links for extra help and examples. Check ‘em out!

If you want your students to explore a topic through research, fully examining the issue from a number of perspectives and addressing diverse questions, you assign a research report, right? Or maybe, a presentation? Sure, those approaches are straightforward and familiar. They’ve also become a bit outdated. The research report, as traditionally assigned, lacks multimedia components. The presentation, as traditionally executed, lacks audience engagement. Neither takes advantage of the tools available to students in our current technological landscape.

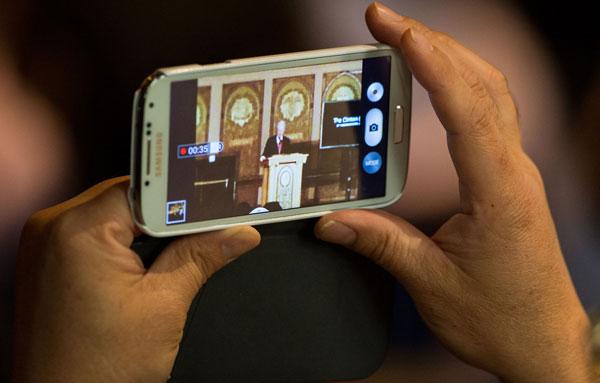
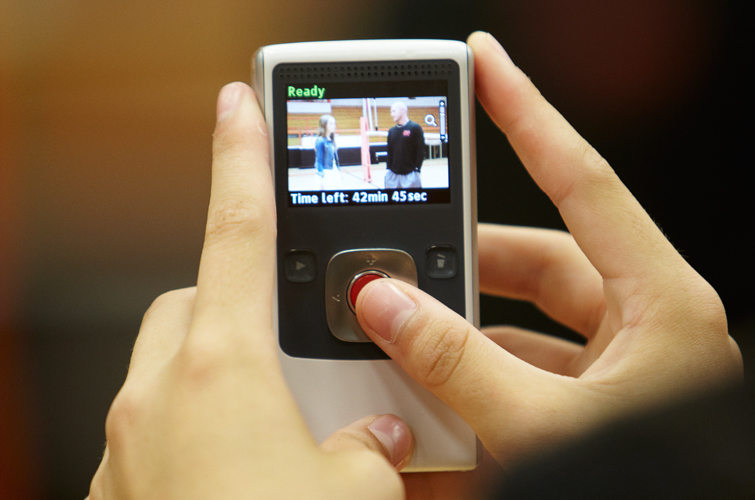
That’s why Health teacher Tracy Donnelly and Zoology teacher Kristen Ireland, both teaching at Northview High School, have opted out of the traditional approach and opted into student video production. Their students have presented research on topics within the curricula through short video documentaries that make use of interviews, narration, titles and images, clipped YouTube content, dramatic re-enactments, and more to mimic a television documentary style. That style has been developed and refined over generations, but the tools at the students’ disposal are pretty new. Students use WeVideo, a free, web-based video editor, to assemble and arrange content produced by themselves and/or captured from the Internet. They use their smartphones to stage and record interviews and dramatizations. They capture images in simple manners and rip YouTube content with more sophisticated approaches. They use WeVideo tools to create captions, titles, and more.

Health Research  P8 School Lunches   YouTube.png
A playful video exploring nutrition pits a student against “Darth Diabeetus” in single combat.

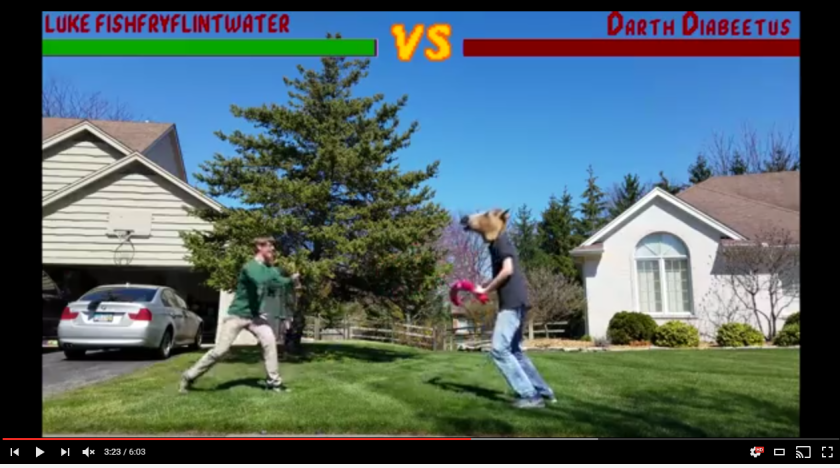
The result? Let’s look at Tracy Donnelly’s health class first. Here, students gather into groups to explore a chosen topic in the curriculum, such as nutrition or bullying. They conduct research to develop a written script. The script then leads them in the creation and cultivation of video content (as well as a formal research paper that Tracy requires). Some students come to the task with more experience and lead the group in the video execution; others learn fast from their guidance. All work on their smartphones and Chromebooks, discussing the content and the video development as they go. The result? Some videos are whimsical and inject their topic with a dose of humor. Many, such as this one, feature students exploring the issue in the context of their own school community. Others go for serious inspection of emotional issues. Often, students mix fact-bearing title images with dramatizations of those facts. The execution is varied, but each video showcases the play of students in a medium that they enjoy playing with.

ZOO_FINAL Paris G .mp4   Google Drive.png
The beauty of the jewel anemone shines forth through the title screen.

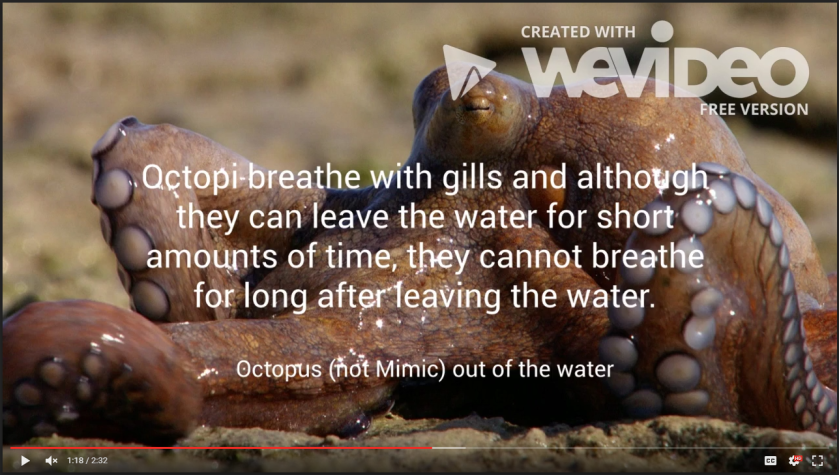
The same goes for Kristen Ireland’s students in Zoology. This year, Kristen assigned a video project in lieu of a final exam. Make no mistake, the assignment was rigorous, but like Tracy’s Health project, students explore video development as their means of expression. Through documentaries on octopi, red scorpions, sea anemones, and more, students record voice-over narration, create titles, edit video, and insert images to answer the research questions asked in the assignment. Each video is an effort to address each requirement of the grading rubric and demonstrate the ability to engage in scientific discourse on animals.

Health Research  P7 Bullying   YouTube.png
Interviews with peers exhibit the student producers’ exploration of their immediate community.

Students have been recording videos to satisfy class project requirements since video cameras became inexpensive enough for schools to buy. So, in a sense, nothing is new here. And, when examining these videos, you may see that students are a bit rough in their video production skills. But step back a check this out in perspective. Now, each student has access to video camera technology at virtually every moment, and all of the footage from that equipment is incredibly portable and flexible. Now, a library of unimaginable hours of video content lie at students fingertips, ready for cutting and integration. Now, cloud technology enables portable collaboration and presentation. None of those current qualities was true even five years ago in our schools. As teachers begin to understand these facts and encourage their students to play with the possibilities, new media of expression will emerge to complement traditional approaches to assessment. As students increasingly face these challenges, their ability to communicate with the semantics and syntax of video will blossom. It’s a colorful, dynamic world of sound and vision. And it’s just ahead.

Mimic Octopus Emily Kelch.mp4   Google Drive.png
Captions merge with audio to express researched information.

Teacher Showcase: Learn the Quadratic Formula Online with Julie Young!

Sure, you know the quadratic formula, but wait till you see how Julie Young is teaching it through Weebly, Google Drive, and more!

If you take math from Julie Young at Arbor Hills, you’re not just in for some of the best math instruction our district has to offer. You’re also in for some pretty cool digital experimentation. Earlier this year, Julie pushed her students not just to learn slope equations, but to demonstrate their learning through digitally-packaged MoveNote lessons, where each student became a teacher. Now, Julie has done it again with the quadratic formula and the web-building platform known as Weebly.

But, before we move to describing what she did, you should know that Julie has not done this alone. This project was developed in close collaboration with Maria Nielsen from Bowling Green. Maria and Julie have developed a powerful partnership, which often includes next-door neighbor Karma Vince. In a further ironic twist, Julie student-taught for Karma in her early days. This little section of hallway at Arbor Hills is a model of collaboration that develops strong teaching and learning, benefiting teachers and students alike.

Now, on to the quadratic formula. What Maria and Julie did is pretty straightforward in concept, even if its implications are impressive. They built a Weebly-based website that collected information on the quadratic formula, provided teaching tutorials, web-based calculators, and other resources, surveyed for formative feedback, and managed a culminating project. That culminating project came from Maria’s work at college, where she and fellow students developed video-based memory aids for learning the quadratic formula, and those videos provided model examples. Students in Algebra 1 developed their own creative ways to learn and remember the quadratic formula, including sock puppets, stories, raps, time-lapse photography, and even a rhetorical channeling of Donald Trump!

Yes, at first the entire sequence seems very traditional, and it is. The teacher has taught a traditional concept in a fairly direct manner. Students are accountable to learn the concept by checking in with learning activities. Then, they complete a multi-factored group project to demonstrate learning. But, the transformation of this process through the Weebly website has a noticeable impact.

First, instead of lecturing the concept, Julie and Maria have curated a selection of text-based and video-based instructional resources. By collecting those and storing them online, students can choose the ones they prefer and consume them at their own pace. The surveys used for formative feedback provide Julie and Maria with easy access to data needed to adjust instruction. And, since the direct instruction is happening online at the student’s pace, they enjoy a much freer hand in modifying class activities to serve the needs identified by the data. These approaches have lead to a delivery of instruction that is more flexible and targeted than the traditional lecture-based or textbook-based approach, and it is more likely to meet the needs of a diverse group of students.

Part Two   Quadratic formula project
Julie and Maria’s Weebly site featuring tutorial videos and surveys for formative feedback.

Second, the design of the culminating project not only takes advantage of student creativity to foster engagement, but it also provides for easier sharing. Part of the project includes students watching each others’ videos and checking out non-video content to provide comments for feedback. The digital management of this process makes it more flexible and portable, while never excluding classroom discussions about the products.

Basically, Julie and Maria have produced a 21st century learning unit that takes the strength of traditional approaches and adds portability, flexibility, and engagement. And, best of all, the approach is so simple that it can be adapted for virtually any unit.

Want to check it out? Go to the Weebly site here and tour through the navigation in the top-right menu. Be sure to visit “Part Five→Comments on Projects” to see student work!

Resource Introduction: Zaption

Videos now become quizzes with Zaption! Add questions directly into videos!


What is it?

Zaption enables teachers to add interactive elements to videos. These elements include text and image slides, drawings, and three types of questions: open response, multiple choice, and checkbox. Teachers can share those videos with students and track their progress through answering the questions. All of this is free and requires only a Google login. A premium upgrade will provide more features, but unlike some free-to-premium services, the free version is very likely all you’ll need. Zaption also offers a gallery of finished lessons.

How can I use it?

Add a video from YouTube or elsewhere and add any of the interactive elements above. Comprehension questions? Sure! Images to enhance content? Sure! Use these elements to convert lessons into interactive experiences and make a flipped classroom more than simply students watching TV.

Who’s using it?

Check out these teachers that know and use Zaption in your school. Ask them for help!

At Southview, Lisa Sobb and Shelley Bielak

Are you or someone you know using this? Notify us, and we’ll post your or their name here as a building expert! Email to aclarkson@sylvaniaschools.org.


Check out Klista Rader’s video tutorial to get started!


Resource Links

Zaption Home Page

Zaption Web Store Download

Zaption YouTube Channel

Zaption Help Center

“How to Create a Zaption Tour” (video 4:18)

Lisa Sobb’s “La del Facebook” Video Lesson

Alex Clarkson’s “How Do Wounds Heal?” Video Lesson

Cool Trick: Quicker “Ripping” of YouTube Videos

Save videos from YouTube quicker and easier than before!

Have you tried Clip Converter? Would you like to save videos from YouTube for use later on? If you answered “Yes” to either question, then learn this cool trick. Using savefrom.net, you can “rip” those videos off YouTube and keep them forever. It’s ridiculously easy!


Savefrom.net FAQ

PD Session: Turn Every Chromebook into a Movie Studio

Come to this session and get introduced to three cool applications that can have a meaningful and beautiful presentation in minutes!

Presented by Laurie McCrary

Presenting last on October 19, 2015 as part of the Sylvania Fall Inservice Day. Next presentation to be announced!


“Tired of PowerPoint presentations? Video creation has become easier and easier with just a simple app! Come to this session and get introduced to three cool applications that can have a meaningful and beautiful presentation in minutes!”

In this session teachers will learn the varied possibilities of video recording in classrooms empowered by Chromebooks. Attention will be given to creating movies, video blogs, and recorded presentations. Apps demonstrated will include WeVideo, ClipChamp, and MoveNote.


Couldn’t make the session?  Check out this video from Anna Searcy on MoveNote!


Session Materials

Laurie’s Presentation Document

Agenda

Google Classroom

Classroom Code: 3iqs8hv

WeVideo Home Page

SDL Resource Introduction on WeVideo

ClipChamp

SDL Resource Introduction on ClipChamp

MoveNote Home Page

SDL Resource Introduction on MoveNote

SDL Cool Tricks Page on Chromebook Recording

PD Session: Spread Your Lessons Through Video Recording

Tired of needing to re-explain everything that an absent student missed in your class? Having trouble condensing your 30 explanations into a 5 minute version for those absent students? Problem solved! Video record your lessons!

Presented by Angie Robinson

Presenting last on October 19, 2015 as part of the Sylvania Fall Inservice Day. Next presentation to be announced!


From the ad: “Tired of needing to re-explain everything that an absent student missed in your class? Having trouble condensing your 30 explanations into a 5 minute version for those absent students? Problem solved! Video record your lessons! Learn how to easily record lessons and post them for class support.”

Participants will learn how to videorecord a lesson using flip cameras and upload that video to a website, Google Classroom, Google Drive, and more. These techniques will be discussed as avenues for student support or a flipped classroom approach.


Couldn’t make the session?  Check out this link to see a video of this session! (Link will be posted the day after the session– October 20th)

[youtube https://youtu.be/LPslxMASjr0]

Session Materials

Angie’s Presentation

Cool Trick: Turn Your Chromebook into a Movie Studio!

Access to Chromebooks empowers our students to record audio and video in exciting ways. Read here to learn five ways to harness this power!

Movies are cool. Television is cool. YouTube is cool. Let’s use that coolness in our projects!

Teachers have been asking students to make film and video a part of project-based learning for generations, especially when VHS formats increased accessibility. And now that digital technology has made those old tape formats archaic, the accessibility and flexibility have increased dramatically. Of course, you’ll need the right tool for the job, and determining which tool will work for the specific job you want can be difficult. Worry not! Read below for 5 tips on how you can use Chromebooks and other simple tools to turn each student into a master movie maker!

Most of these tips discuss apps and extensions that add directly into a Google account. Once added, they become part of the user’s account and will open each time the user opens the account. Becoming comfortable with adding these tools can help you add to your and your students’ digital toolboxes. But, do not feel overwhelmed. Just think about what you want to do and read the process!


One: You and your students can use smartphones to record video footage.

clinton-phoneA surprising number of students carry smartphones with them to school every day, and that means each one of them carries a video camera with them. If you want your students to shoot footage without being limited to a desk and Chromebook, ask them to use their phones. They know how to use the video recorder on their phone, so recording is no problem. Once the recording is made into a file, they can share it with you or upload it into a video editor simply. They can either upload it to Google Drive using the Google Drive phone app or email it to their Gmail account. Both methods bring the file to the cloud, where they can do what you’d like them to do with it.

Advanced tip: Google Classroom now allows for students to submit photos taken on a phone straight to a Classroom assignment. Check out this video to see how.

Two: Students can use Chromebooks to record themselves.


ClipChampChromebooks can record audio and video through the webcam installed in the machine. This makes the Chromebook ideal for recording a single student or pair of students reading, opinionating, or discussing. Just aim and shoot. The best app for this is
ClipChamp. A student can download the ClipChamp app through their Chromebook Webstore. The app is then loaded any time they need it. Clicking it takes students to the ClipChamp web page, where a single click begins recording. Then, once the file has been completed, the student can upload it straight to their Google Drive. ClipChamp doesn’t even require an account. Simple!

Three: Students can use Chromebooks to record a presentation for practice or submission.

movenote1What about split screen? Some apps allow a student to record a window and their face at the same time. Cool, huh? One of the best applications for this is the recording of presentations. Let’s say you want a student to record a presentation for practice. Or, you want them to record a presentation to send to a peer for review. Or, you want them to record a presentation for you to grade from home. Easy. Use MoveNote. This app allows students to record two screens at once. One is their presentation file (Google Slides, PowerPoint, PDF); the other is their face in the webcam. The app is simplified in that it uses the student’s Google login to run, so they can use their student account for the work.

Advanced Tip: Using Prezi? MoveNote will not show a Prezi presentation as is with all animation, but it will take a PDF download of the presentation. The student can still use MoveNote for practice and review, even if the full presentation will require live delivery. Check this out to learn how to download a Prezi presentation into PDF format.

Four: Students can use Chromebooks to record their work online. You can use Chromebooks to record lessons and instructions.

snagitWhat if you want to record a lesson or a set of instructions for students? What if you want students to record their own work on the Chromebook as part of a project portfolio? You can do that through the Screencastify extension. Download it into your Google account and use its simplified recording controls to record audio and video from the screen. You can even see an image of the speaker from the webcam if you wish and turn it off if you do not. Better yet, Screencastify links to a Google account, so students can directly upload the recording to their Google Drive.

Five: Students can edit footage together into a full movie.

WeVideo2Your students recorded video. Now what? Well, they can submit what they have, of course, and that’s great for simple applications. But what if you want them to develop a multi-shot project? Students can produce a full movie with edits of multiple shots, imported still images, titles, transitions, and music with WeVideo. WeVideo is accessible for free through the student’s Google login. The free version lacks some of the power of the premium version, but with it, students can still upload up to 5GB of data and create videos up to 7:30. The app uses an efficient timeline format for importing and moving content to develop into a full movie.

Advanced Tip: Do you want to use professional music for your movie, but you’re afraid because of copyright issues? Check out this library of free songs for use in videomaking. As long as you attribute these users, they have no problem with your use of their song!


Our students are born and reared in a visually engaging and visually demanding world. If you give them the opportunity to explore the concepts of your class through video, you will not only access powerful skills they have, but also help them refine those skills for the next challenge. Have fun!

If you would like help with any of these applications, feel free to ask for help!

Would you like to add to this discussion? Share your experiences and expertise through the comment feature below.

Resource Introduction: SnagIt


What is it?

SnagIt is an extension that plugs into Chrome to record live work on the screen of a Chromebook or desktop. The service records anything that happens on the screen, including a user moving from one tab to the next, searching through the Internet, accessing links, or typing into documents. Anything that the screen sees, it sees. It also records audio, so a user can narrate what is happening on the screen for a full audio and video experience. The best part is that SnagIt links to your Google Drive account, so the user can automatically upload the recorded video to their Google Drive. Simple tools and solid functionality make this a great screen recorder for students and teachers alike!

How can I use it?

Teachers can use this for a flipped classroom. They can record what’s happening on the screen, which could be a lecture presentation file or series of websites. It could be used to record instructions as well. Imagine you want students to log into an online service from home. Try recording a quick 3-5 minute that shows them how and linking that video on Google Classroom (which is simple because the video would already be in your Drive).

On the other side, students can use this to record their own work to submit to you. What if you want them to narrate how they conduct research? What if you want them to narrate a presentation, but you do not need to see their face? This will work for those applications and much more.

Are you or someone you know using this? Notify us, and we’ll post your or their name here as a building expert! Email to aclarkson@sylvaniaschools.org.


Check out this quick tutorial for SnagIt for Google Chrome. Then look at the links below for more detailed assistance.


Resource Links

SnagIt Home Page

SnagIt Download for Chrome

“Making Video Lesson Recaps with SnagIt and a Chromebook” An excellent tutorial on flipped lesson recording with a trick to embed the speaker’s image (video 6:31)

“SnagIt for Education” Intriguing Advertisement of SnagIt with an Education Focus (video 1:26)